Pets, Plants, and Computer Vision
Header

Open Skinner Box – PyCon 2014

May 27th, 2014 | Posted by admin in automation | code | cute | domestic life | Internet of Things | Open Source | OpenCV | pics or it didn't happen | PyCon | python | RaspberryPi | Uncategorized | vermin - (Comments Off on Open Skinner Box – PyCon 2014)

I’ve been hacking like a fiend on nights and weekends for the past few months trying to get ready for PyCon. This year I wanted to do an introductory talk about how you make internet enabled hardware using Python. The first step of this process is figuring out what hardware you want to make. I decided I wanted to do something for my pets as I am splitting my time between Boston and San Francisco and I can be gone for a week at a stretch. My friend Sophi gave a great talk at last years Open Hardware Summit about creating a low-cost nose poke detector for research and I decided I could sorta do a riff (in the jazz sense) on that idea. I decided to create an Open Skinner Box using a RaspberryPi and a few parts I had around the house.

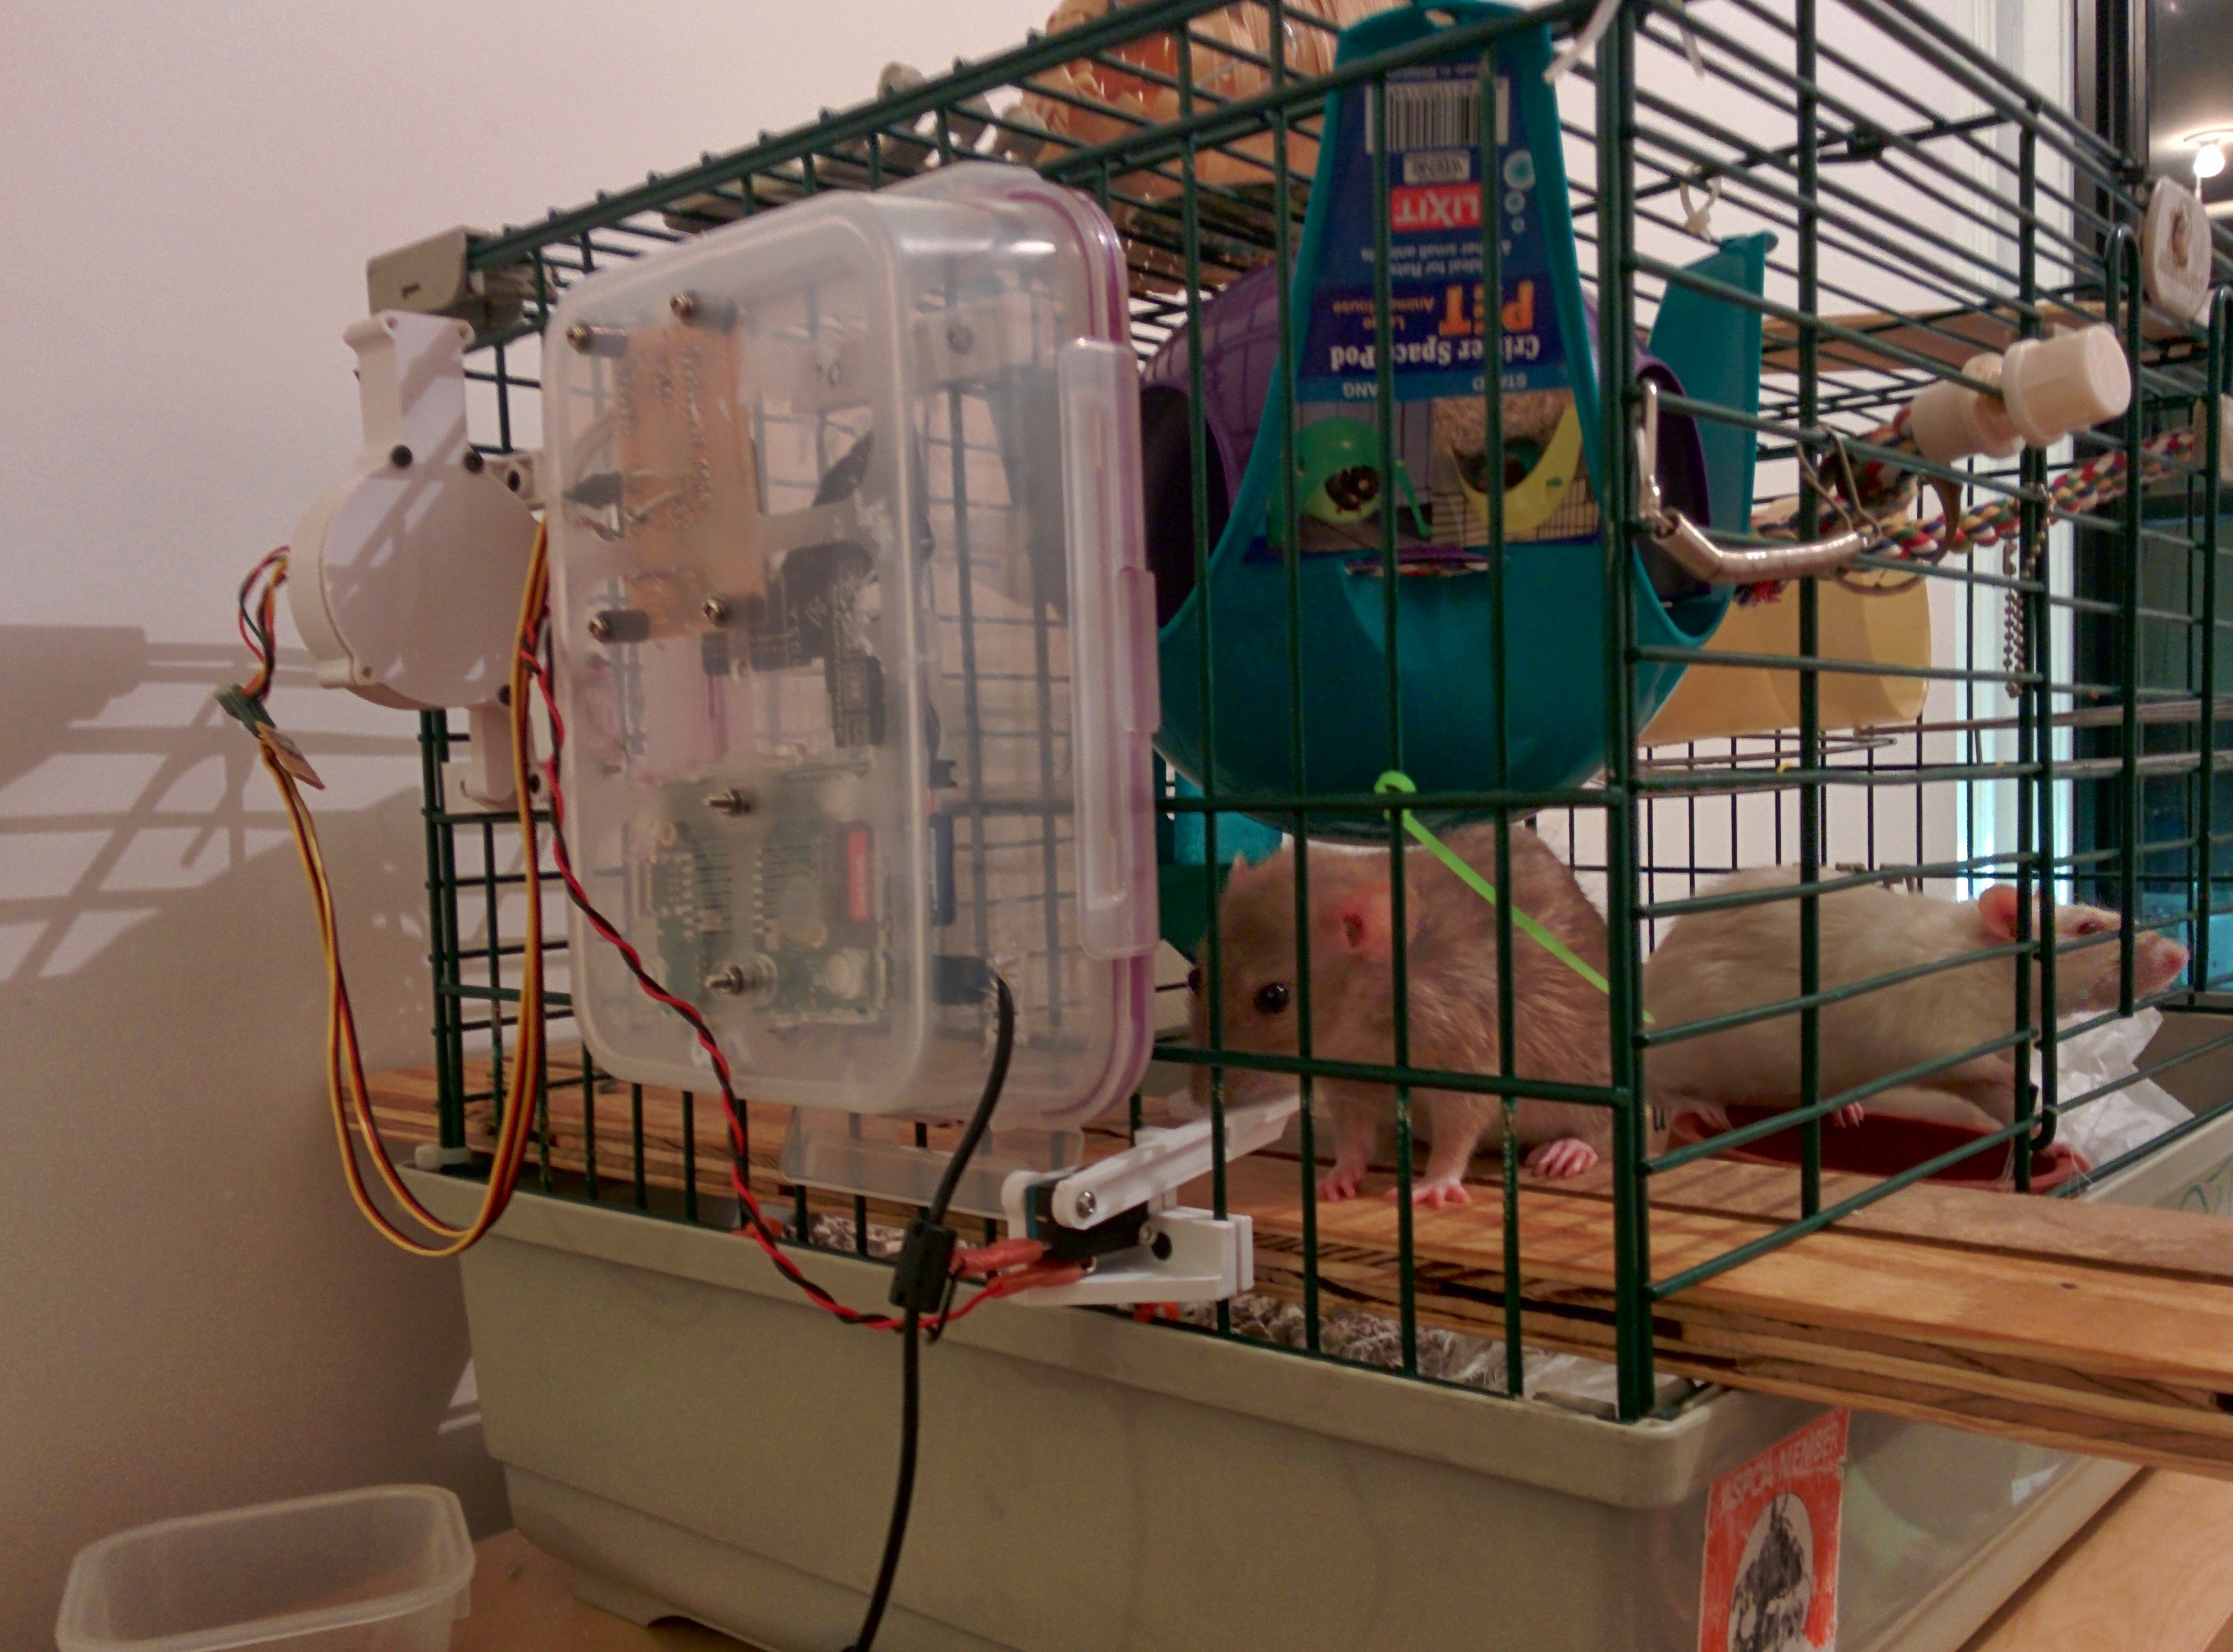
Open Skinner Box in situ

Open Skinner Box in situ

A Skinner Box, also called an operant conditioning chamber, is a training mechanism for animal behavior. Generally a Skinner box is used to create some behavior “primitives” that can then be stringed together to do real behavioral science. The most basic Skinner Box has a cue signal for the animal (usually a light or buzzer), a way for the animal to respond to the cue (usually a nose poke detector or by pressing a lever), and a way to reward the animal usually using food. The general procedure is that the animal hear’s or sees the cue signal, performs a task, like pressing the button, and then gets a treat. This is not too far off with the training most people do with their pets already. For example, I have the rats trained to come and sit on my lap whenever they hear me shake a container with treats.

The cool thing about a Skinner box is that they are used to do real science. As a toy example, let’s say you wanted to test if some drug may have an adverse effect on learning. To test this scientifically you could have two groups of rats, one set of rats would get the drug and the others wouldn’t. We would then record how long it took the rats to learn how to use the Skinner box reliably. The scientist doing the experiment could then use this data to quantify if the drug has an effect and if that effect scales with the dosage of the drug.

So what does it do?

I wanted to create not just a Skinner Box but a web enabled Skinner Box, a sorta internet of things Skinner Box. So what features should it have? I came up with the following list:

  1. I should be able to see the rats using the Raspberry Pi’s camera.
  2. The camera data should be used to create a rough correlate of the rat’s activity.
  3. The box should run experiments automatically.
  4. I should be able to buzz and feed the rats remotely.
  5. The web interface should give a live feed of all of the events as they happen.
  6. The web interface should be able to give me daily digests of the rats activity and training.

The Mechanical Bits

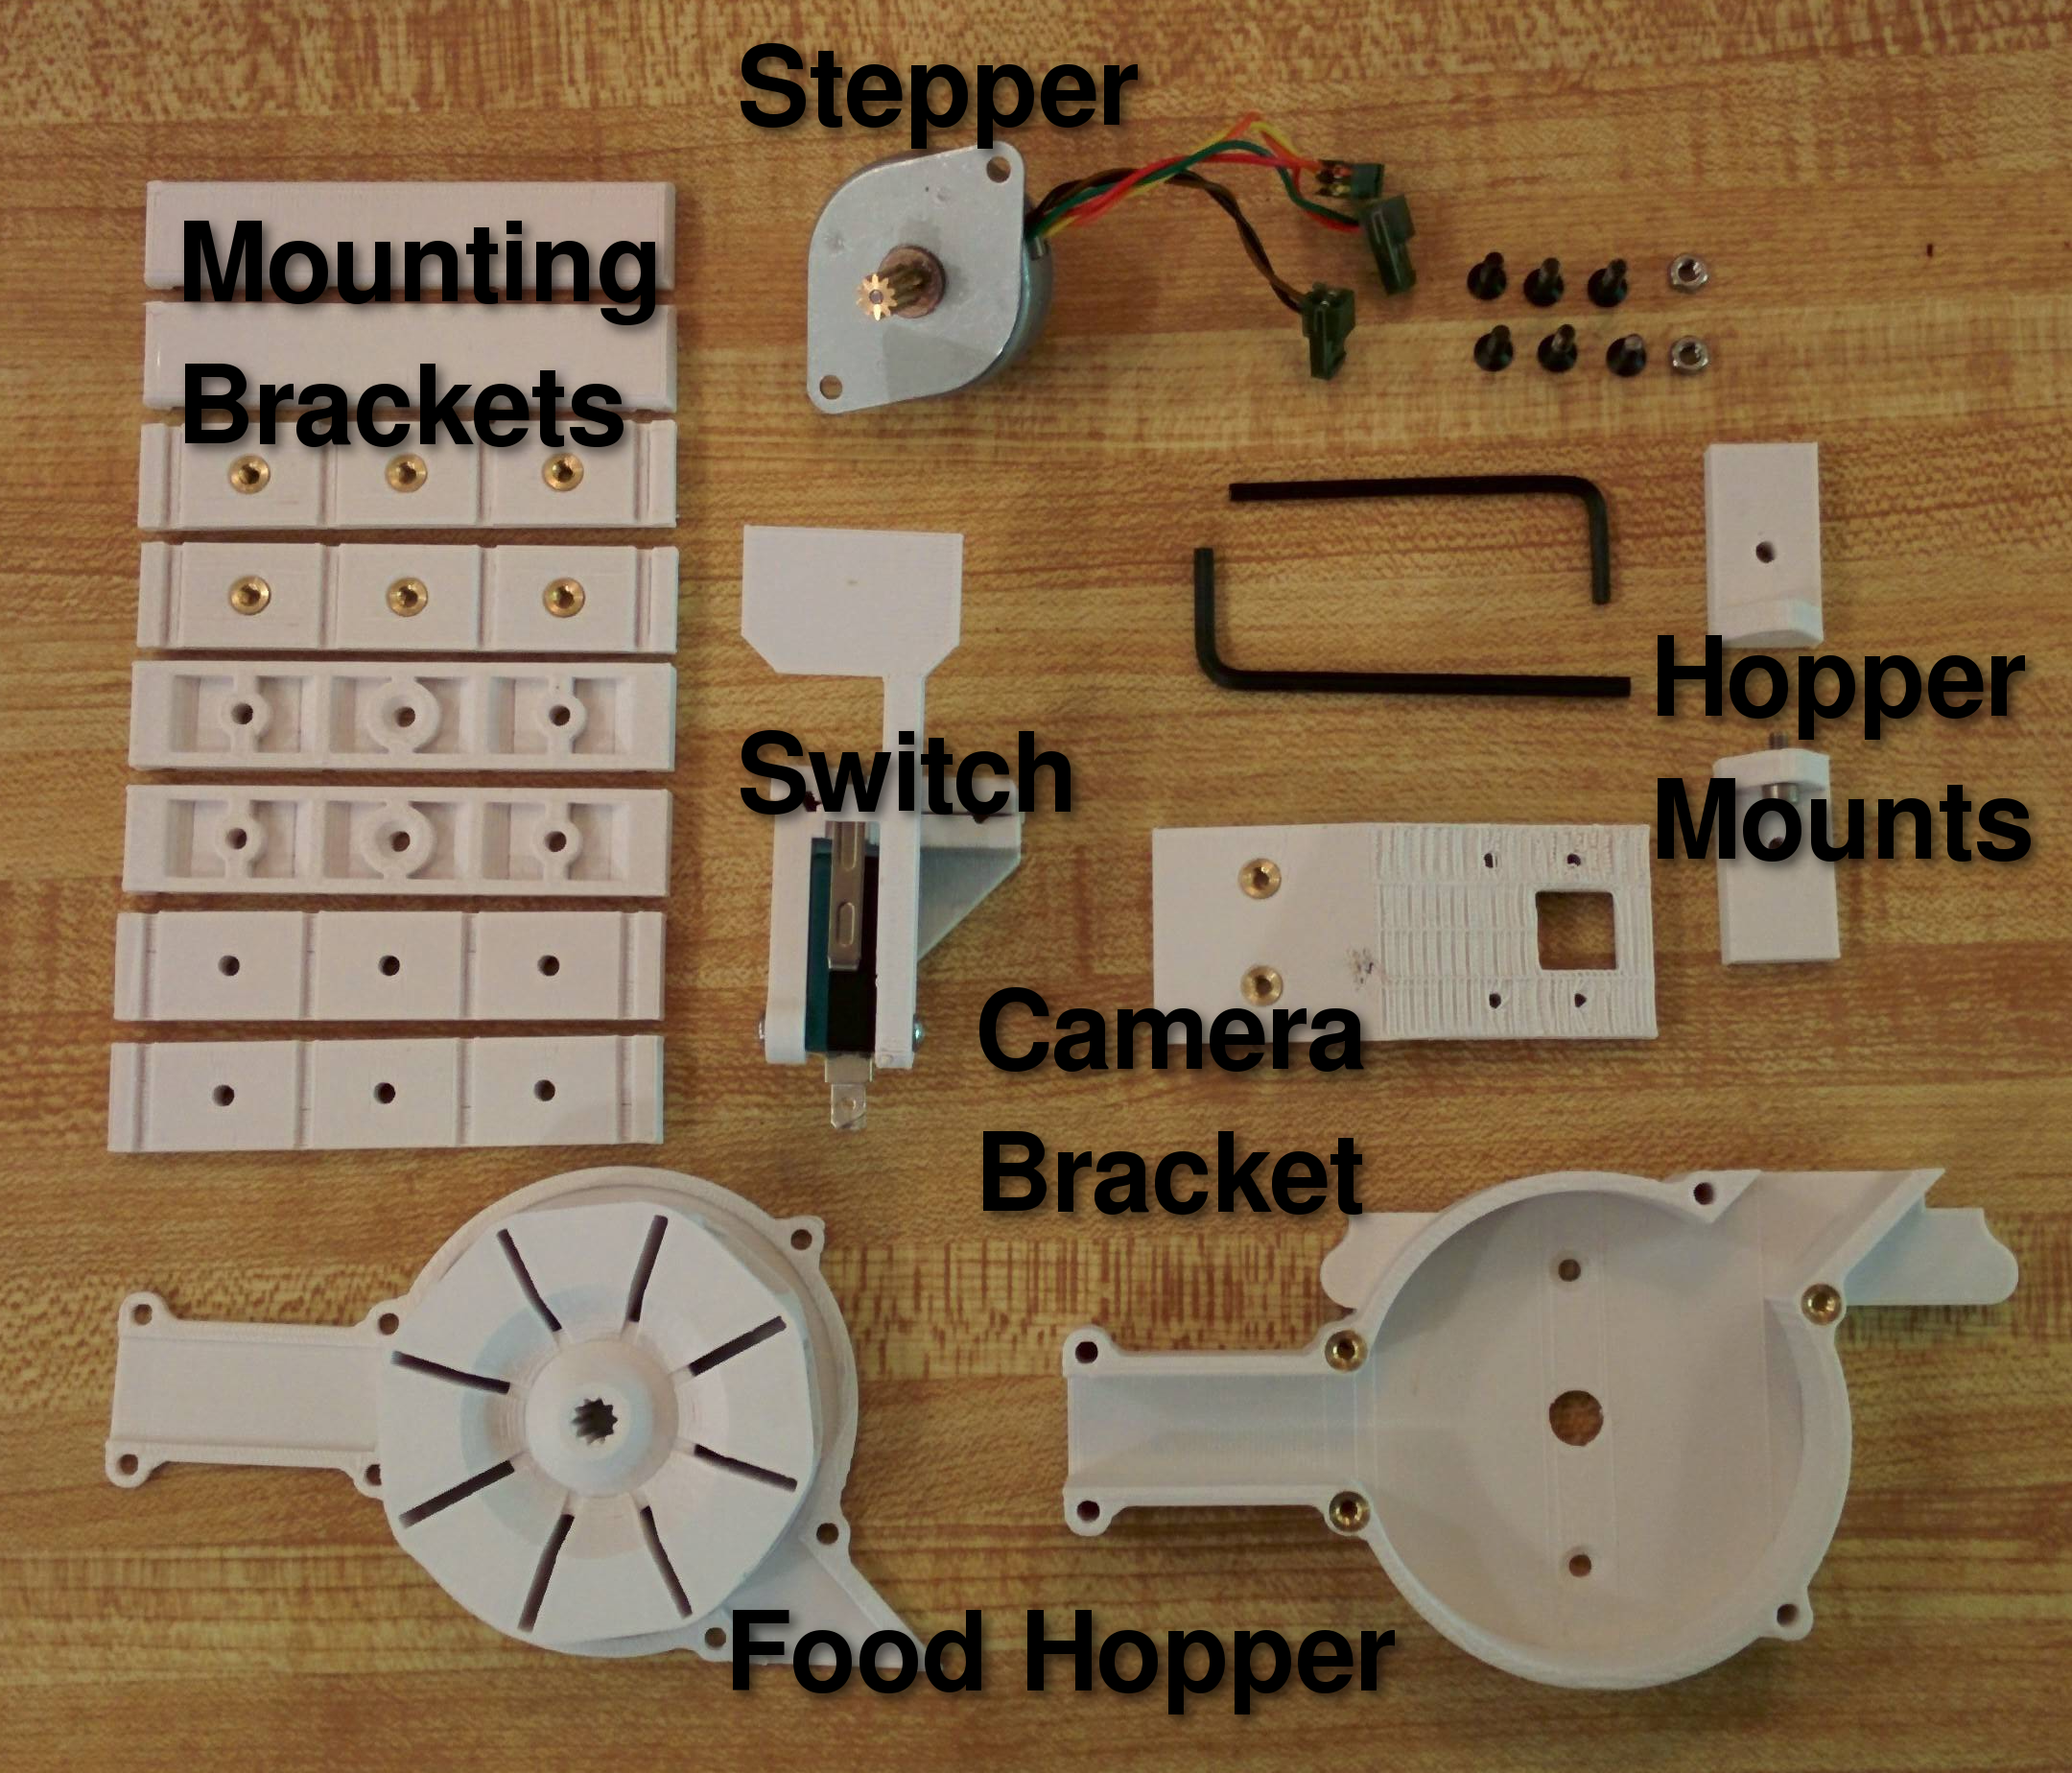
Mechanical Bits of the Open Skinner Box

Mechanical Bits of the Open Skinner Box

To build the Skinner Box I got some help from a mechanical engineer friend of mine. He is a 3D printing whiz and designed the mounting brackets, food hopper, and switch mechanism for the Skinner Box. One of the cool things I learned in this process was how to use threaded brass inserts for mounting the parts to the cage and attaching the different parts to one another. There is a great tutorial here as well as this video. The source files for all the parts are now up on thing-a-verse if you would like to build them.

The Electrical Bits

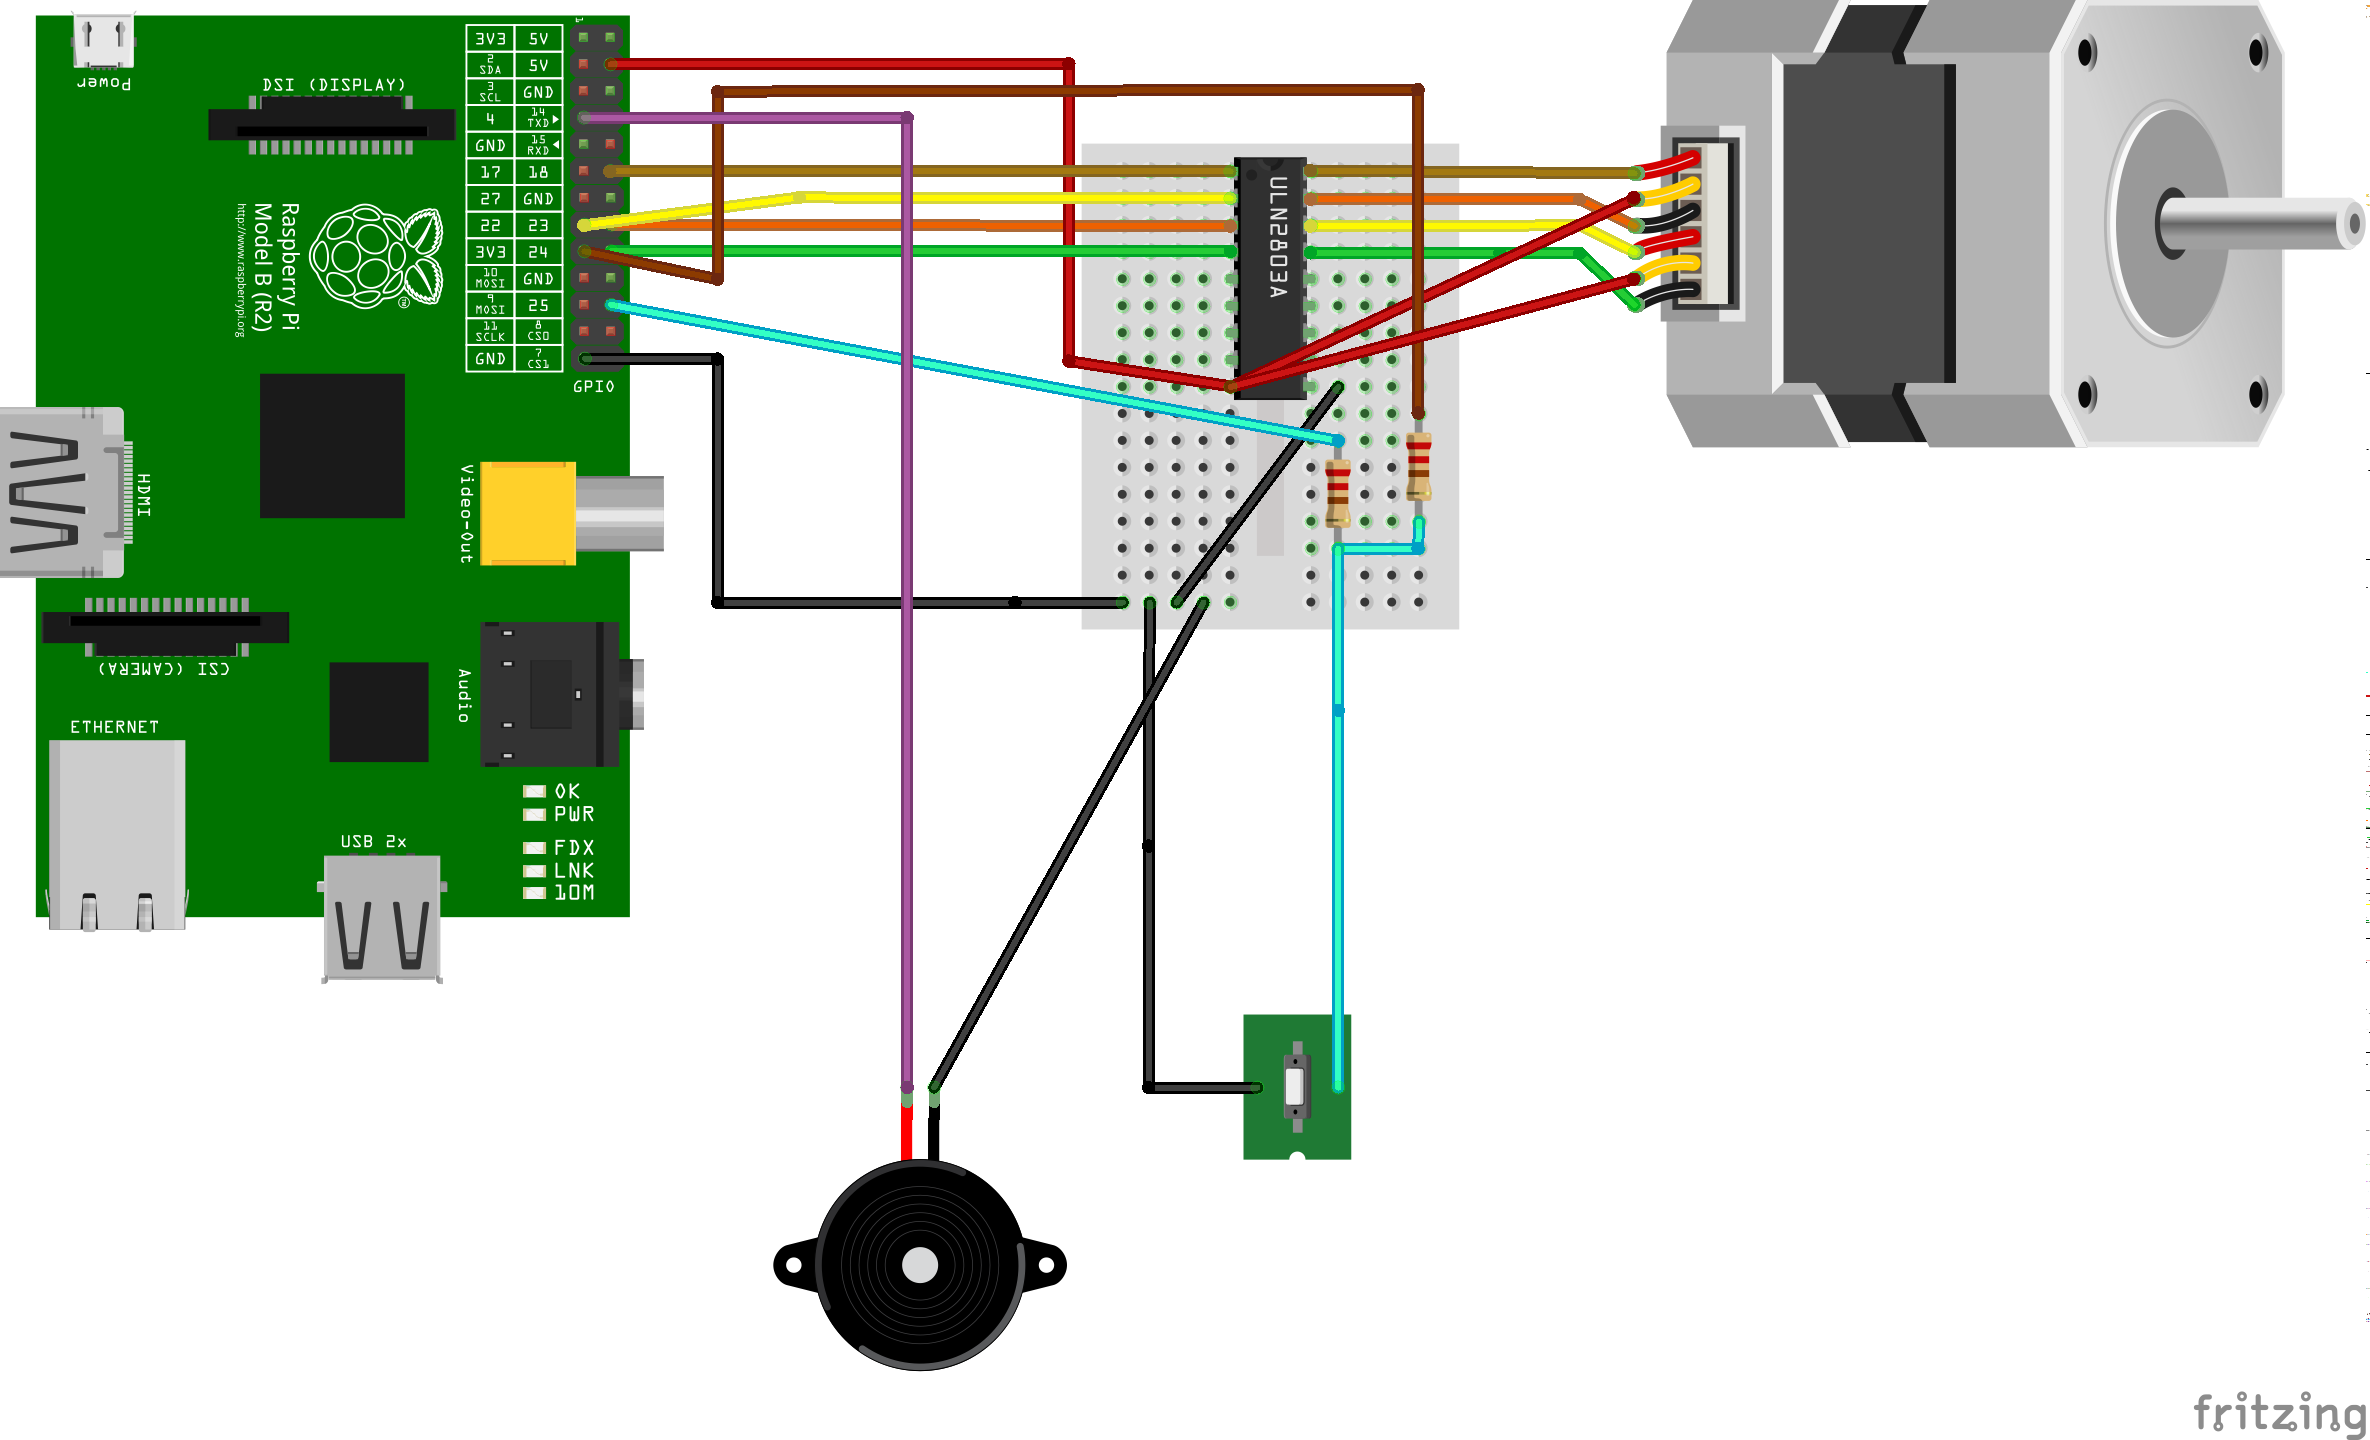
Skinner Box schematic - originals are in the github repo for the project.

Skinner Box schematic – originals are in the github repo for the project.

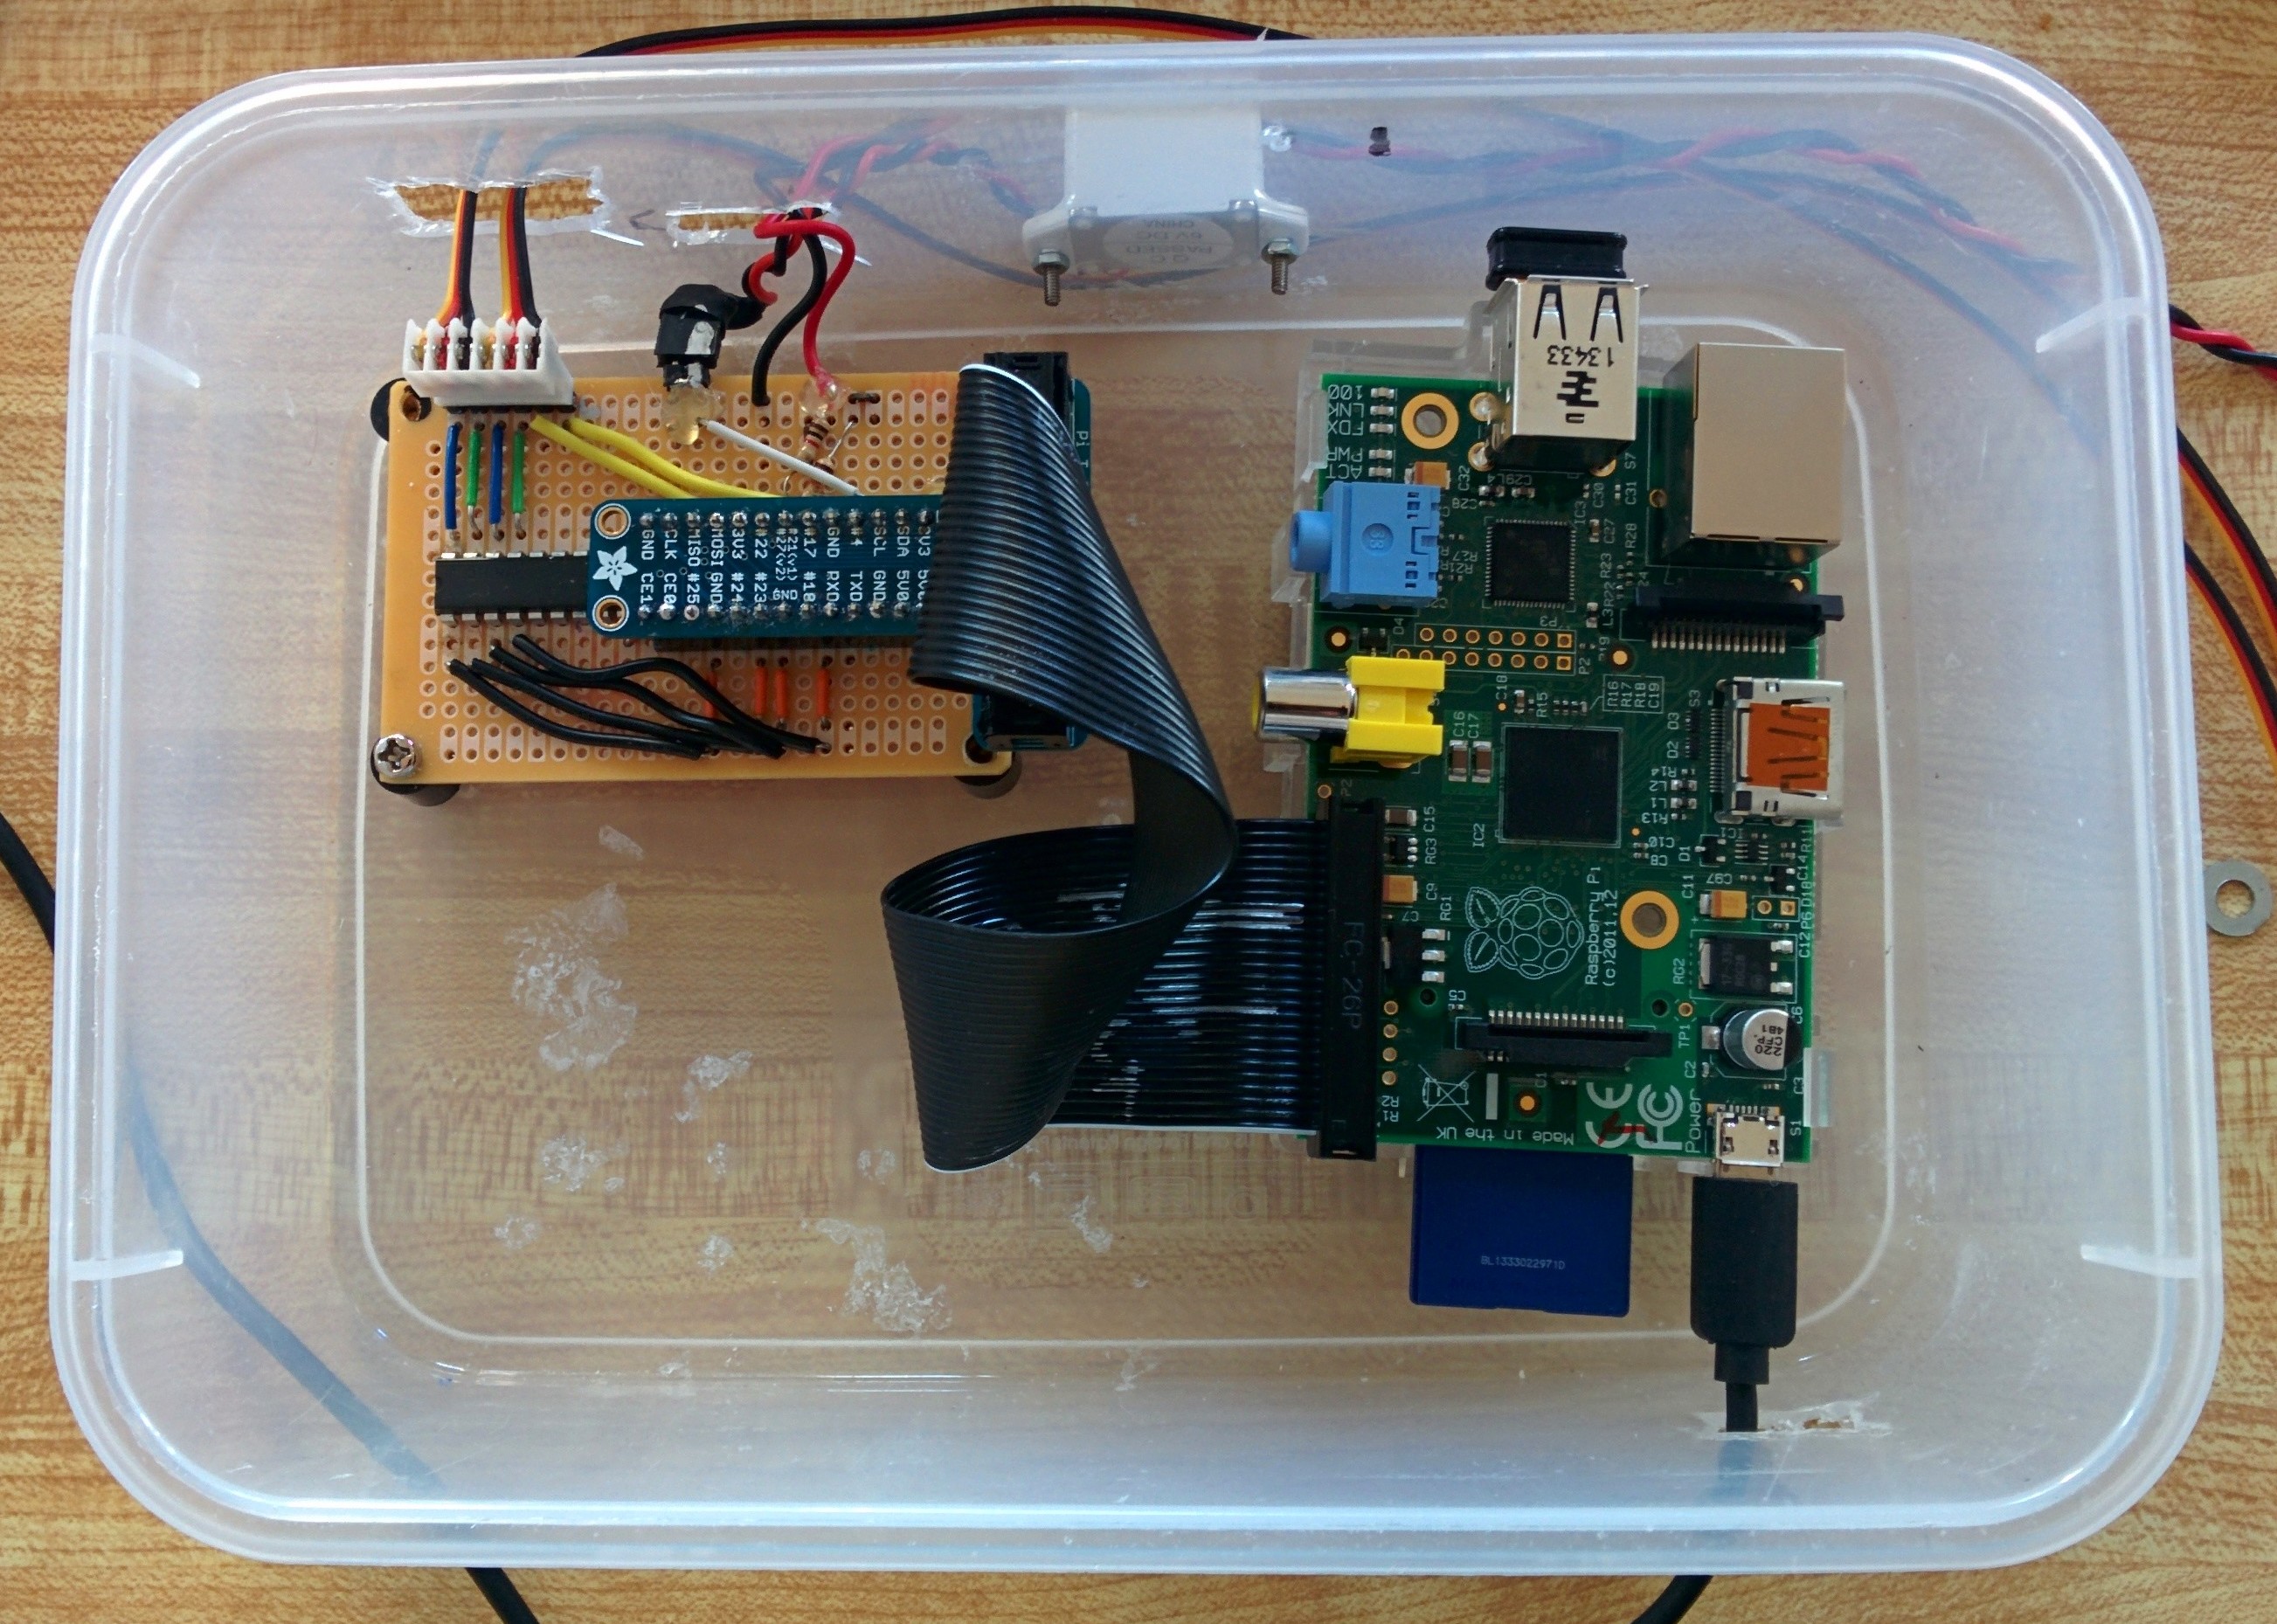
For the electrical components in the project I used the Raspberry Pi’s GPIO pins to control the stepper, read the switch, and run the buzzer (although one could easily use the audio out). I opted to run the stepper using the RaspberryPi’s 5V source and it seems to have just enough juice to run the stepper motor. The stepper is controlled via four GPIO pins (two for each coil). The GPIO pins and the 5V source are connected to a LN2803 Darlington array that shunts the 5V source to the stepper based on whether the GPIO pins. In the next revision I will probably use a separate stepper driver and a beefier stepper like a NEMA 17. I soldered everything to a bread board for this revision but I will probably get PCBs fabricated for the next revision. When I was soldering and debugging the board I found ipython super useful. I could send each of the GPIO pins high or low and then trace the path with my multimeter. I have put both the Fritzing CAD files and a half-complete bill of materials up on github if you would like to replicate my work.

Finished Open Skinner Box electrical components.

Finished Open Skinner Box electrical components.

The Software Bits

Because I was presenting this project as an intro lesson PyCon I wanted to use as many python libraries as possible. Right before the conference I open-sourced all of the code and put it in this github repository. Some of the components I used, for example matplotlib, are sub-optimal for the task but they get the point across and minimized the amount of java script I had to write. The entire app runs in a bottle web server with the addition of greenlets to do some of the websocket work. I set the webserver up to use Bootstrap 2.3.2 to make everything look pretty. For data persistence I used MongoDB. While you can get Mongo to build and run on a RaspberryPi in retrospect I really should have dug into the deep storage of my brain and used something like PostgreSQL. Mongo is still too unstable, and difficult to install on the Pi.

The general theory of operation is that there is the main web server that holds four modules, three of which are wrapped in a python thread class. These modules are as follows:

  1. Hardware Interface – uses GPIO to buzz the buzzer, monitor the switch, and run the stepper.
  2. Camera Interface – uses OpenCV, PiCamera, and Numpy to grab from the camera, save the images, and monitor the activity.
  3. Experiment Runner – looks at the current time and decides when to begin and end experiments (e.g. it rings the buzzer, waits for the rat to press the lever, and dispenses a treat.
  4. Data Interface – Stores event,time stamp pairs to Mongo, does queries, and renders matplotlib graphics

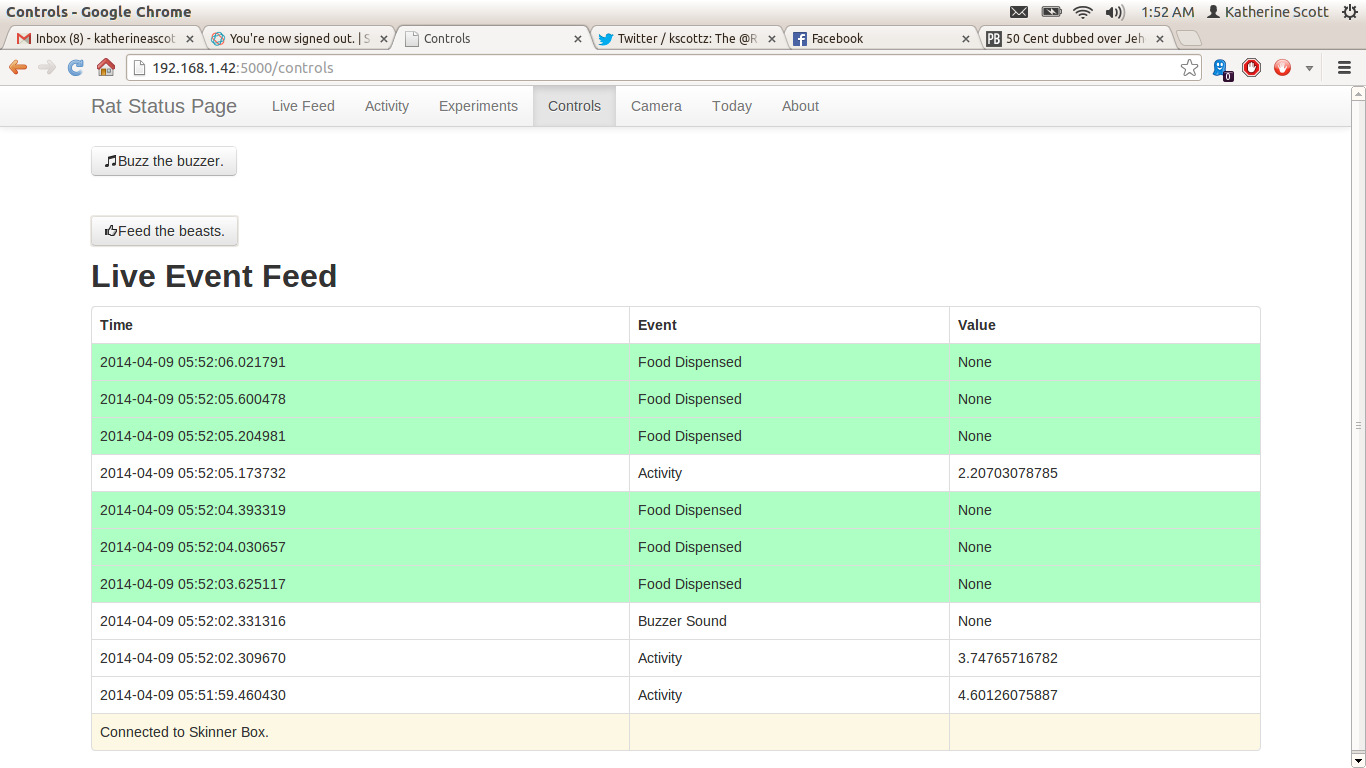
To get all of the modules to communicate cleanly I used a simple callback structure for each module. That is to say each module holds a list of functions for particular events, and when that event happens the module iterates through the list and calls each function. For example, whenever there is a button press the button press loop calls the callback function for the data interface to write the event to the database, a second callback tells the experiment runner that the rat pushed the lever, and a third callback renders the data to the live-feed websocket.

Rat Stats -- need to replace this with some Javascript rendering.

Rat Stats — need to replace this with some Javascript rendering.

All routes on the webserver basically point to one or more of the modules to perform a task and create some amount of data to be rendered in the bottle template engine. For example for activity monitor page I have the DataInterface module query Mongo for every activity event in the past 24 hours and I then render it using matplotlib and save the result to a static image file. The web server then renders the template using the recently updated static image file. While this works, matplotlib is painfully slow. To control the feeder and buzzer remotely I simply have post events that call the dispense and buzz methods on the hardware interface. The caveat here is that these methods are non-block and are guarded simply by a flag. So for example, if you hit the feed button multiple times in a row really fast only the first press has an effect.

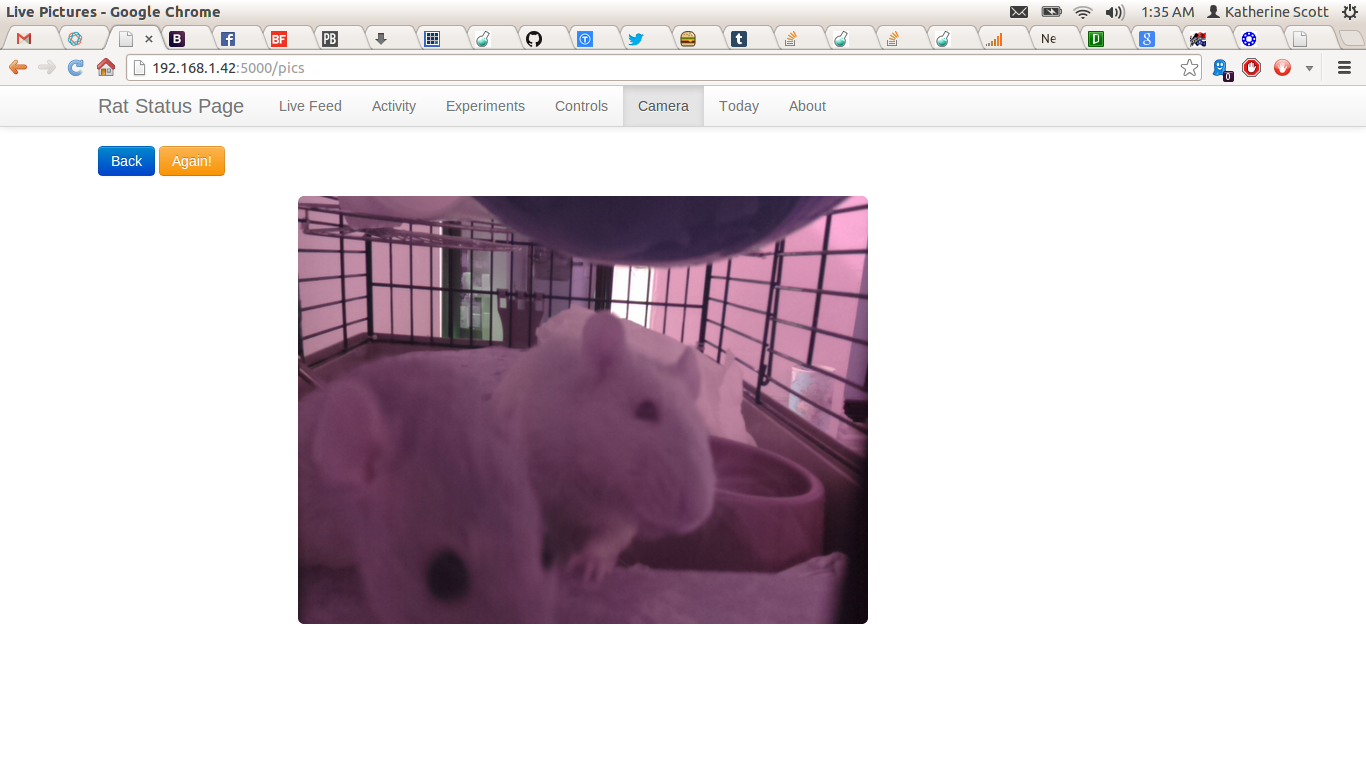
Skinner Box Live Shot

Skinner Box Live Shot

The camera module seems to work reasonably well for this project and I amazed by the image quality. The only drawback with the camera module is that basically you have to choose between still images and a stream of video data right now there is now really good way to both debuffer the camera stream and process the individual frames. I opted to take the less complex route of just firing the camera for still frames at the fasted rate it would support which is about once a second. Because of processing limitations on the pi I need to scale the image down to about 600×800 to do my motion calculation. For the motion calculation I just perform a running frame difference versus a more computationally costly optical flow calculation. This is a reasonably good approximation of net motion but it is subject to a lot of spikes when the lighting changes (e.g. when you turn the lights for the room on). Additionally in my haste of getting this project up and running I opted not to put a thread lock around the camera write operation. This means that sometimes when you visit the live image page you get a half finished frame. This is something that I will address soon.

Live Events Feed

Live Events Feed

Putting it all together.

I have tested the system on the rats with some limited success (see the videos below). There are some kinks I still need to work out that prevent me from running the system full time. For example, the current food hopper wheel jams fairly frequently and so farm seems to only deliver food 2-3 times before jamming. Also the buzzer I used is exceptionally annoying, and since the rats live in my bedroom I don’t want to run protocols at night when the rats are most active(rats a nocturnal). Moreover, I don’t think my current pair or rats is suitable for training. I have one exceptionally old rat (almost three to be exact); and while she is interested she lacks the mobility to perform the task. The other rat has been one of the more difficult rats I have tried to train. Normal rats can learn to come when called (or when I shake the treat jar) this rat is either too timid or too ambivalent to care most of the time.

Building a Better Mouse Trap

The Skinner box runs reasonably well at the moment but there are quite a few things I would like to do to make it more user friendly and robust. Ultimately I would like to harden the designs and then turn them over to someone to commercialize. As with an engineering task design is a process, and you get a kernel of working code and then improve and build upon it until you finally reach a working solution. Here is what I would like to do in the next revision:

  1. Replace Mongo with Postgre SQL.
  2. Replace Matplotlib with a javascript rendering framework
  3. Fix the camera thread lock issue and create a live stream of video and also store images to the database.
  4. Move the food hopper to an auger based design to minimize jamming.
  5. Add a line break sensor to make sure the rats get fed from the food hopper.
  6. Add an IR LED illumination system for the camera and add a signal LED to work with the buzzer.
  7. Improve some of the chart rendering to support arbitrary queries (e.g. how well the rats did last week over this week.
  8. A scripting language for the experiment runner. Right now the experiment runner buzzes and waits for a button press, but really I think the rats should start with random food deliveries and work up to the button press task.

How To Build Raised Garden Beds

April 24th, 2013 | Posted by admin in Ann Arbor | domestic life | gardening | Michigan | plants - (Comments Off on How To Build Raised Garden Beds)
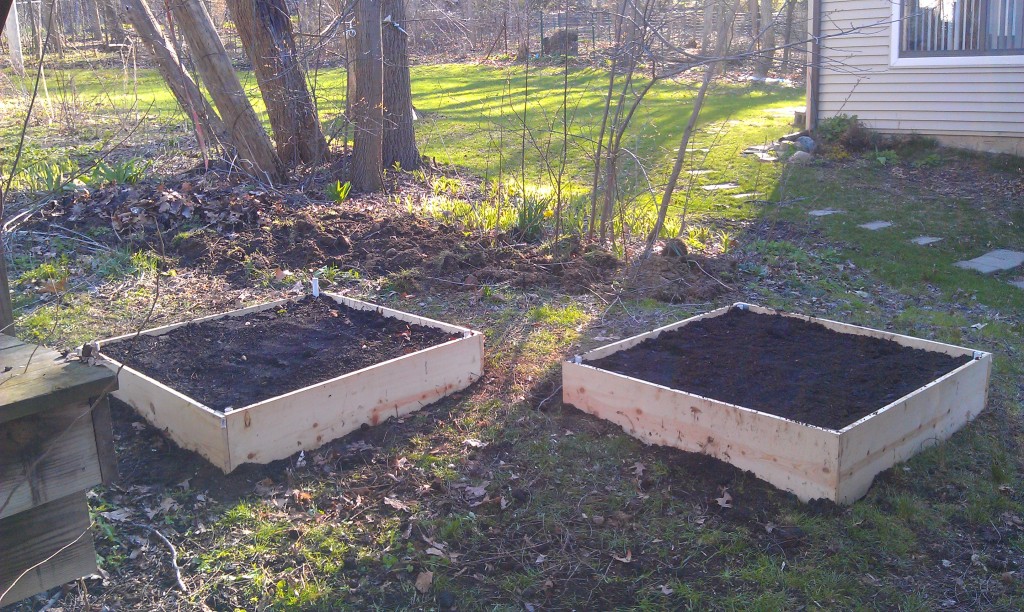
The finished product, two 4'x4' raised beds.

The finished product, two 4’x4′ raised beds.

The weather in Michigan was finally warming up so I decided it was time to build some garden beds. I had helped build raised beds in the past but I had never done it on my own. It ended up being a lot easier than I expected and I was able to build two of them over the weekend and still have time to go out.

My backyard is extremely small and a good portion of it is taken up by a platform and stairs that lead to the upstairs apartment. To make matters worse the yard is sloped and has a small wooded area with a few large trees that subdivide my yard from the neighbors. Since I had so little space to work with I opted to build two “square foot” style raised bed gardens. Square foot gardening is a methodology that has been around for almost 30 years and it provides great results in a limited amount of space. The addition of the raised beds helps to prevent soil compaction and generally make the garden a lot easier to maintain. Since my yard is sloped the beds also prevent my soil from running everywhere when it rains.

All told I spent just a little over $100 for all the parts to build the garden including the compost. I also built the beds in such a way that I could quickly add a trellis or hoop house depending on what I wanted to grow and the time of year by snapping the fixtures into some PVC pipe I placed at the corners of the beds. Here is the materials list to create a single raised bed.

  • 4 12″x4’x1″ pre-sawn sections of untreated pine (~$6.50 each)
  • 8 3″ 18Ga steel angle brackets (~$1.25 each)
  • 1 50 count box of #8 3/4″ wood screws (~$4.65 each)
  • 2 4 count packs of 1″ two hole pipe strap (~$1.29 each)
  • 4 sections of 3/4″x24″ PVC Pipe (cheap)

Make sure you use untreated wood as treated wood can leech preservatives into the soil. I got all of this stuff at Home Depot and I was in and out in about 30 minutes.For the fill dirt I picked up a cubic yard of municipal compost from the city for only $21.20. The compost looks fantastic and I mixed with a bit of the fill dirts from the bed and some leaf litter from around the yard to fill up the beds completely. You will want a five gallon bucket to move it around as well as a tarp to put it on so it doesn’t run all over the yard.

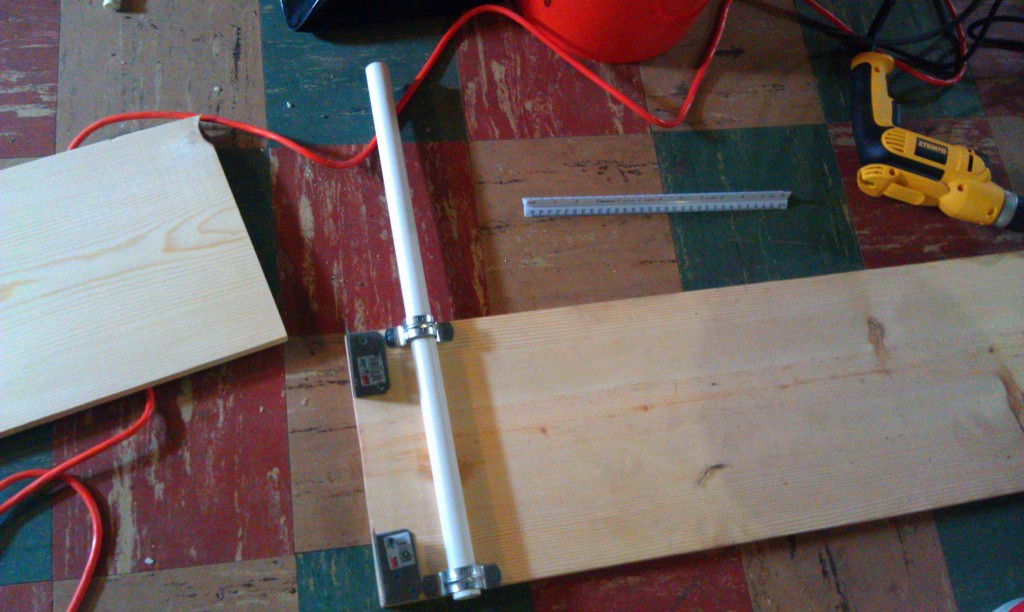
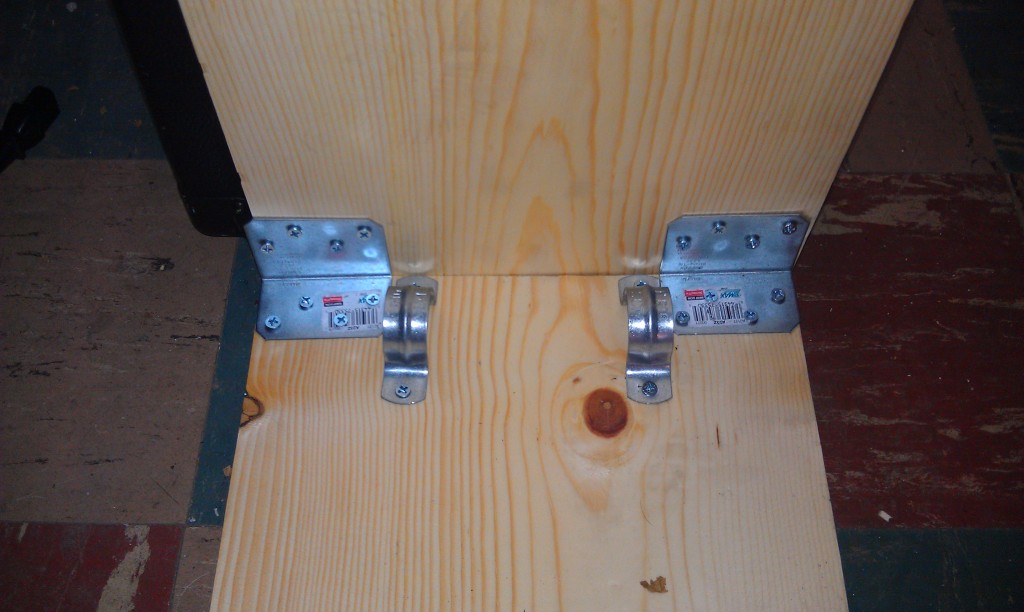
To construct the beds I really quickly manufactured four “connector boards” where I placed the L brackets and pipe straps onto the board. I made sure to leave just enough space on these boards so I could get the drill to fit in the corners of the beds.

One side of the "connector" boards. Note the placement of the pipe straps to make it easier to screw everything together.

One side of the “connector” boards. Note the placement of the pipe straps to make it easier to screw everything together.

Once I finished my connector boards I then screwed each one onto a plain board to form four “L” shaped pieces. To do this I put the connector board on the floor up against a wall and then wedged a regular board behind it.

Making "L" sections.

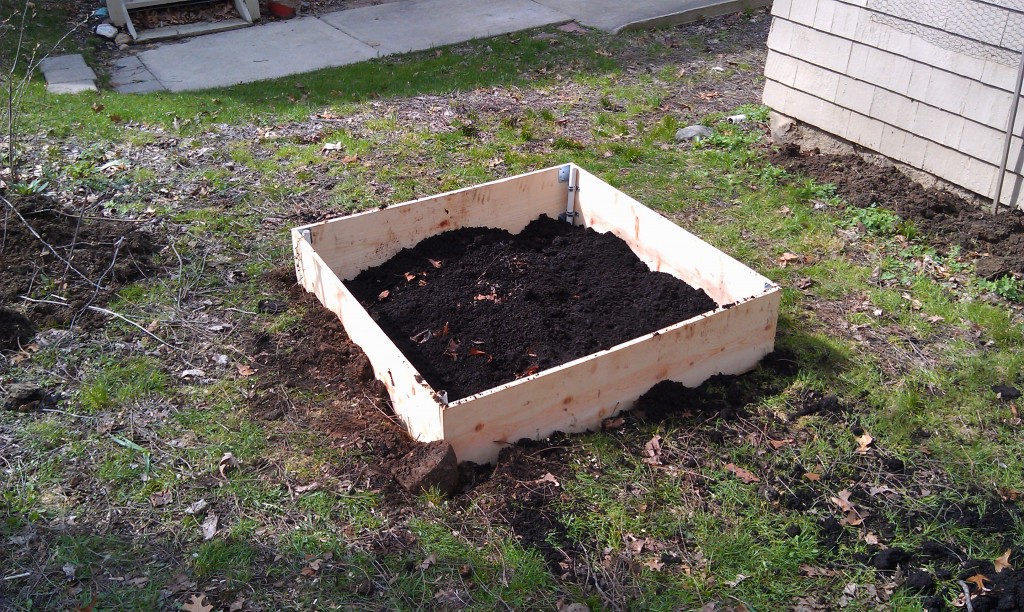
Once I finished the “L” sections I took the whole thing outside and used some cinder blocks to hold everything in place while screwed the sections together. I then started digging out the beds. I wanted each bed to sit level on the sloped yard so I dug out sections that were more or less flat. I had to make the holes slightly larger than the beds. I used rocks that I found while digging to help prop up the corners and provide some extra drainage. Once the beds were in placed I filled out the outer edge with dirt to secure everything, and then I used the flat side of my shovel to drive the PVC pipe into the ground a foot below the beds. This should keep the beds in places. If I decide I want to build out hoop houses or trellises I can remove the pipes and replace them with suitable materials.

Read to fill with compost.

I then proceeded to fill up the raised beds with the compost I got from the city. Residents of Ann Arbor can get a free cubic yard of compost every year from the waste center, I opted to have mine dumped into the back of my friend Joe’s truck which cost $21 but it was money well spent.

Getting compost from the city of Ann Arbor Compost Center.

Getting compost from the city of Ann Arbor Compost Center.

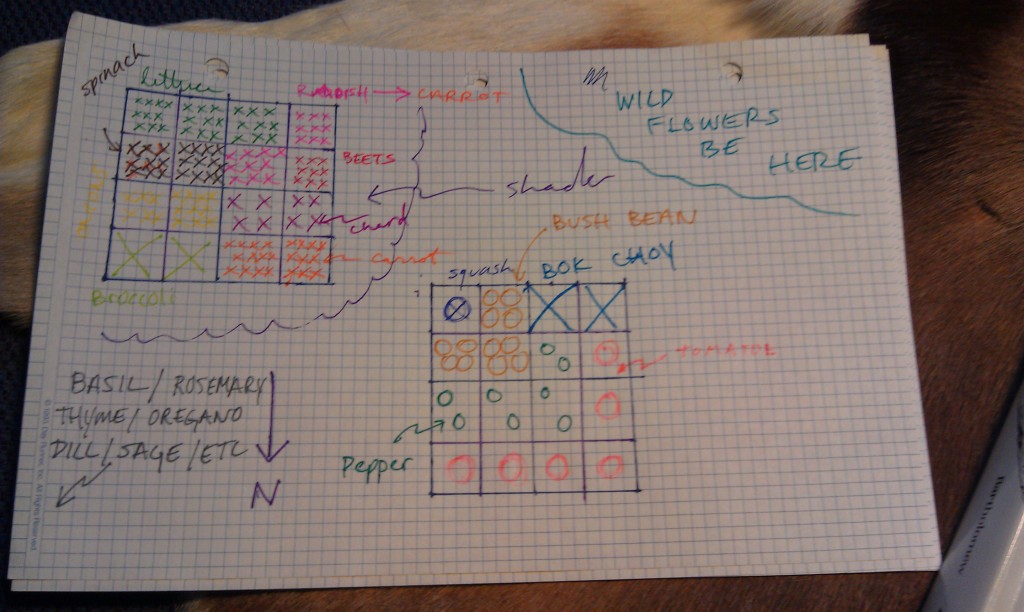
It took me almost three hours of shoveling and filling up five gallon buckets to fill the beds. It was back breaking work and I need a long hot bath afterwards but it was well worth it. I just picked up most of my seed from Downtown Home and Garden. They sell seed for most of the common garden vegetables in bulk so it is a lot cheaper. I also ordered some heirloom tomato and pepper seedling from the Project Grow plant sale. I had a Project Grow community garden plot for five years and it is worth noting that all of the proceeds from the sale go directly to Project Grow. This is my current sketch for what I am going to grow in my beds. As with any landscaping project it is helpful to plan your layout first to take into account lighting and watering contraints as well as views. I will post pictures as soon as I get everything in and sprouting.

My tentative garden layout.

My tentative garden layout.

Perler Bead Project

July 2nd, 2012 | Posted by admin in code | computer vision | domestic life | Fun! | Uncategorized - (Comments Off on Perler Bead Project)

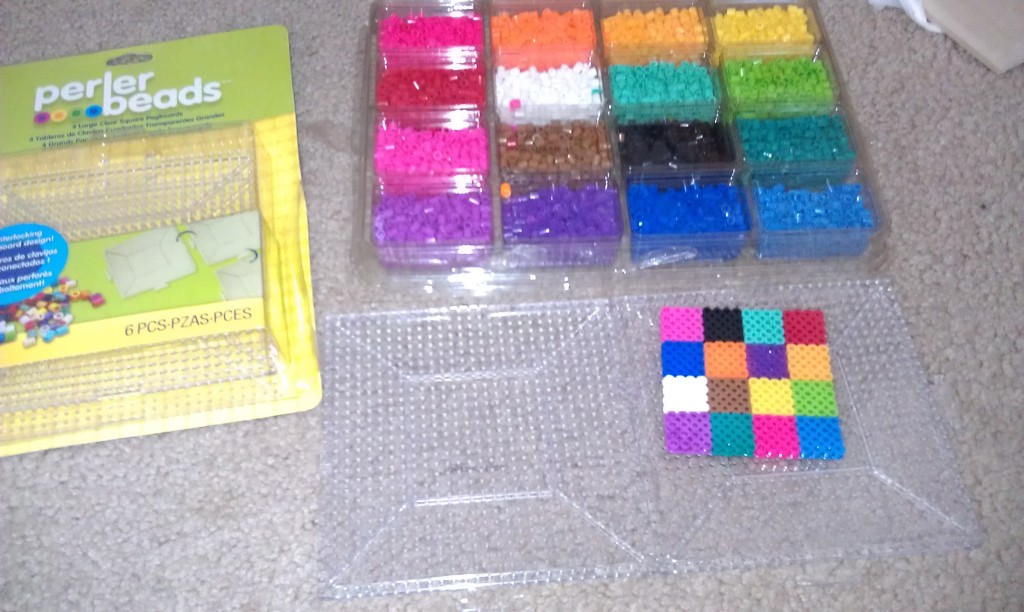
So I had to run to Jo-Ann fabric for a few odds and ends. My Mom gave me a couple of 50% off coupons and on a whim I purchased some perler beads and a tray for about $10. Perler beads are this kids craft where you patiently place little plastic beads on tray and then fuse them using an iron to create various toys. I am pretty sure that the beads themselves are just a ruse by the vacuum cleaner companies to sell more powerful vacuums.

Perler Beads

Perler Bead Set

I wanted to see if I could use SimpleCV to map images to  pearler bead colors to create little coasters from my photos. I took the beads and created a square calibration grid so I could pull out the colors. I then quantized the image to a palette and saved the results.

This is what the calibration grid looks like when I quantize it to have 16 colors (note that this result is not repeatable because of the k-means calculation’s initial conditions).

To test my approach I used an input image (in this case Lena), pixelized the image to match the perler bead grid, and then re-applied the quantization to the pixelized image. The results are not that great.

Image pipeline, input, pixelized image (17×17 block size), and quantized result.

There are about five colors in the output image and it seems to lose a lot of its information. I did some digging and found that two things seem to be going on. First, the quantization step seems to have some bad initial conditions. This is to say that I take the image and try to cluster the colors in it into 16 groups using k-means. If the algorithm starts with a bad initial condition a lot of the clusters “run into one another” and I end up with less than 16 color groups. The other problem is subtler and has to do with image dithering. I anticipated that this might be a problem because gif images also use a quantized color palette (for gifs it is 256 colors) to compress the image size. Back in the old days of the web you would use a technique called dithering as part of your gif compression algorithms to make photographs look more realistic. Generally dithering is used to lessen the effect of quantization error around gradients. To illustrate this I found an image on wikipedia with a lot of colors and color gradients, here is what would come out of the naive SimpleCV quantization (top is input, bottom is output using img.palettize(bins=256)):

Quantization makes things look weird. The top is the input image and the bottom is the image quantized to only have 256 colors (just like a normal GIF image).

Now here is the same result using ImageMagick with GIF dithering turned on (specifically the command: convert test.jpg -dither Riemersma -colors 256 test.gif).

Still 256 colors, but the dithering makes the gradients around the lights less apparent.

As you can see the dithered images look way better. The effect seems to hold even when I shrink the number of colors down to 16 but still use dithering. In the two images below the top is the output from SimpleCV quantizing to 16 colors, while the bottom is ImageMagick result with added dithering (note that there may be some re-compression artifacts from when I saved the image).

Top is SimpleCV’s output when I quantize the image to have 16 colors, while the bottom image is ImageMagicks results with 16 colors and dithering.

Hopefully in the next week or two I can read up on dithering algorithms and see if I can’t add a few to SimpleCV.

Praying Mantis Habitat

June 15th, 2012 | Posted by admin in Ann Arbor | cute | domestic life | Fun! | mantis | Michigan | Uncategorized - (Comments Off on Praying Mantis Habitat)

Today I caught a juvenile praying mantis in the bushes outside the office. There are only two species in Michigan it looks to be the more common Chinese Praying Mantis. I had to stop at the pet store today on my way home to get some supplies for the rats so I picked up a few things to make a mantid habitat. All told I think I spent about $15. I have done a fair bit of insect rearing in the past and it really isn’t all that hard. My first job as an undergrad was to tend a colony of giant Madagascar Hissing Cockroaches at a research lab at the University of Michigan. Keeping a colony of insects running is about as difficult as keeping a couple house plants alive, if not easier. You basically need to provide food, water, and shelter, and sometimes muck with the climate. Since praying mantis live wild in Michigan you don’t really need to make a lot of climate considerations other than not placing the animal’s cage in direct sun light.


image

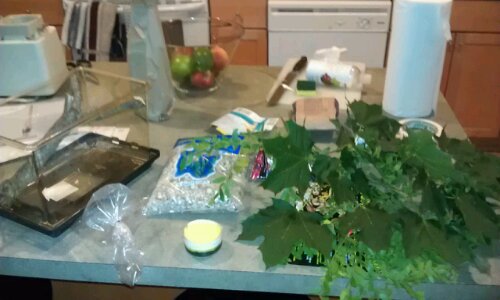
Supplies (terrarium, gravel, sponge/cup, leaves/twigs, and crickets)

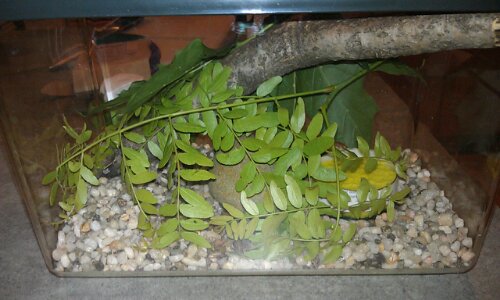
To create the habitat I got a $10 two-gallon plastic terrarium at the pet store. I also picked up a small bag of gravel for about $2.50 and a dozen small crickets for a buck. To create a  habitat I rinsed out the terrarium and place some gravel on the bottom. I then added some sticks and fresh twigs I found in the yard. Praying mantises like to hunt while perched in grass and brush so it is important to provide some vertical features in the terrarium. For water I took an old plastic container (like a yogurt cup), cut it down to about an inch high, and then cut a clean sponge to fit the cup. The mantis and its pray can drink up water from the sponge without the water spilling everywhere. Once the cup is filled the sponge should stay wet for at least a few days at a stretch. Praying Mantises will only eat live food, so I picked up a half dozen small crickets, but I fear they may be too large for such a tiny mantis. To supplement that mantis’s diet I am going to add a moldy piece of fruit that has fruit flies to the terrarium. The hope is that the mantis will eat the fruit flies until it reaches a suitable size to capture the crickets. To capture the fruit files I put half an apple out by my dumpster over night. The apple should provide food for the fruit flies and the crickets for at least two weeks.

The finished product

The finished mantis habitat.